Wednesday, November 1, 2017

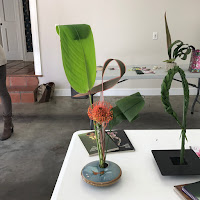
The Amazing Art of Leaf Manipulation

Talented Kanawha GC members Anne Silbernagel, assisted by Marion Jones, hosted a leaf manipulation workshop.   Both ladies are candidates in the Garden Club of America's (GCA) Flower Arranging Judging Program.

What is Leaf Manipulation?  The GCA Yellow Book definition is: "altering foliage by using one of the following techniques; folding, twisting, cutting, pleating, braiding, or wiring."

"These techniques should be used to strengthen the Principles and Elements of Design when composing your design.  the Principles of Design are Balance, Contrast, Dominance, Proportion, Rhythm, and Scale.  the elements of Design are color, Form, Light, Line, Pattern, Size, Space and Texture."

Anne brought Aspidistra, Horse Tail or Equisetum, Monstera, Flax and Sanseviera leaves. 

One of the reference books Anne used was Gail Emmon's Leaf Manipulation Manual.  Gail's book may be purchased through the website linked here. She first suggests conditioning your leaves by cutting the ends and submerging in buckets or the bath tub.  Then, feel the leaves once work starts so that they can be warmed up and molded by your hands.  Keep your items simple, clean and focused.  She lists her tools:  scissors, flower clippers, wire cutters, floral stapler & staples, scotch double-sided tape, straight wire in different gauges, floral tape, small cable ties, rulers, glue dots, utility knives and your hands!

Another reference she used is Bruno Duarte - the owner and creative director of Fresh Floral Creations in Toronto, Canada.  Both Anne and Marion attended the 2016 Newport Flower Show where he was the featured arranger.  At that show he focused on Texture and Movement.  The photos at the bottom of the pages are ones that Anne took at Newport.  Duarte is known for his innovative design techniques.  Be sure and check out his photo gallery design page - I'm inspired!

A third reference is Mary Ellen O'Brien, a GCA club member from the Lenox Garden Club.  On her website Flower Show Flowers, she offers links to Easy Fast Floral Designs, conditioning, styles, her blog and more. Sign up for her blog - it looks wonderful.  The techniques or "Effects" below are listed by Mary Ellen:

  • RIBBON: Using an Aspidistra leaf, gently fold the leaf lengthwise along the main rib.  Wish scissors or clippers cut through the rib in 3 places about 1" apart from each other.  The cuts should be about 1/4-3/8" deep.  After making the cuts, pull each section outward.  The sections can be turned and twisted for a great effect.  Take the cut end and wrap with tape or wire and place into a water source.
  • RIPPLES: Aspidistra leaves can be folded repeatedly to create this effect.  They can be manipulated further by spinning the pleated portion around to create a rounded effect.  Once satisfied with the overall look of the leaf, the leaf can be stapled together with a common household stapler.  Placing several manipulated leaves together creates a petal effect. 
  • ROLLED:  The Aspidistra leaf tips are rolled and the stems of Celosia are inserted through therolled end.  The leaves are held in place with Glue Dots.  End ends of the Aspidistra are allowed to fly freely without a water source; the leaves are very hardy and will not wilt for several days.
  • CRISS CROSS:  Two cuts are made down the length of the leaf on either side of a central rib.  The two outside leaf sections are crisscrossed over the top and the bottom of the central rib.  The central rib is stationary.  The two outside sections can be fastened down with Oasis ® brand Blue dots.  The finished leaves have a crisscross pattern tubular in style.
  • SNAKESKIN:  The Aspidistra leaf is cut lengthwise on either side of the central spine creating 2 pieces.  The remaining spine piece is discarded.  Then cut the flat leaves into squares all approximately the same size.  Take on square, fold in half, then fold in half again around the base in ribbon-like fashion and hold with a glue dot.  The small scale-like pieces are added around floral foam or can be stapled to another element (such as a potato sliced on the bottom creating a flat bottom). 
  • TUBULAR:  Place an Aspidistra leaf on a flat surface with the tip and stem pointing in an East-West direction.  Roll the leaf around a pencil or other tube-like object and make it as snug and tight as possible.  The cut end may be stapled, tied or fastened with a Glue Dot.
  • WOVEN: Lay the Aspidistra leaf on a cutting board and using a straight edge cut the leaf at even or uneven intervals as many times as desired.  Longer stems can be woven through the cuts.  Single or multiple stems may be placed into one leaf.
  • ST'RING:  With the leaf on a flat surface, make several small incisions near the outer edge of the leaf, trying to space them evenly apart.  After the cuts are made, take a small object such as a toothpick and put it through the slit.  Gently pull the toothpick through the leaf from one end to the other.  The growth pattern of the leaf will keep the lines more or less parallel.  Continue with as many slice as desired.
  • PLEATED:  Staring at the tip of the Aspidistra leaf, fold and staple; continuing until the central rib becomes stiff and hard to bend. If you choose to continue the full length of the stems the rigid central portion will break and look jagged; detracting from the overall appearance of the pleated leaves.
Photos from our workshop:


From the 2016 Newport Flower Show of Bruno Duarte and taken by Anne Silbernagel.


Other references:
Lakeside Garden Club: Leaf Manipulation
Pinterest:  search leaf manipulation
YouTube videos (youtube.com): search leaf manipulation


Tuesday, March 21, 2017

How to Arrange Flowers Using Grocery Store Flowers

Our January program was a terrific and fun meeting!  Snow flurries and cold weather greeted the day, but warmth and good cheer were inside at our meeting.  This program would make a great program for any garden club!  If any readers from other clubs have tried this before, please do comment at the bottom and let us know what additional things you may have done.  This is a joint post by our Program Chairman (Lynn) and Flower Arranging Chairman (Beth).

"As 2nd VP for Kanawha GC, I am responsible for planning the programs for the entire year of monthly meetings.  We have a committee that makes program suggestions as well getting input from  members from the previous year's committees and random suggestions  fom other members.  Since Kanawha GC members love hands-on workshops and fun, we needed a different type of meeting than a speaker.  We have several members that plan out of town trips around Flower Shows (translate to nervous/fearful!) and have, in the past, tried to take the mystery out of flower shows with flower arranging workshops. 

Looking for new and innovative ideas for meetings, I read the GCA webpage that suggested and evaluated speakers to see what other clubs were doing. 

I ran across a blurb written by another club about videos on YouTube that dealt with taking the mystery out of arranging grocery store flowers and that gave me a fun idea.  Since our Flower Show Committee is responsible for the meeting, I called Beth and passed along the suggestions.  I also suggested that we show several videos and then have different members arrange the flowers.  My suggestion was to keep the program a secret so that our 'fight or flight' members would not plan a trip.  I suggested that we pull members' names out of a hat to do the arranging.  Had I been diabolic, I might have suggested that we 'stack' the deck with those 'flight risks'!

Lynn


At Lynn's suggestion, the Flower Show Committee presented a program "Flower Arranging Using Grocery Store Flowers" with a surprise participation segment similar to the competitive cooking show "Chopped" - without the Chop!  She requested that planning for the meeting should remain a 'secret', which we honored as best we could.  I, the Flower Show Chairman, opted for a little help from about 4 members of our committee. 

This is what we did.

First, we viewed several YouTube videos on "How to Arrange Flowers Using Grocery Store Flowers".  There were lots to see and lots of fun personalities.  We chose three that we thought were entertaining, not too long (2-3 minutes) and demonstrated distinct arrangements our club might be interested in.  This would be the foundation for our competition.

We introduced the program by engaging in a short skit that went somewhat like this:

Beth:  "I'm going to talk about Flower Arranging today. "
Anna: (with a loud, panicked shriek from the middle of the room that snapped us all to attention!) "Whhaaaat!!!  How do I arrange flowers?  I can't do it very well, and it is always so intimidating!?  I shouldn't have come today." (much laughter from the membership as they realized what was happening).
Beth:  (reassuring voice) "Stay calm, Anna.  We will make this easy!"
(More back and forth panic by Anna and reassurance from Beth).
Beth: "How about if we watch a few YouTube videos to help with this problem...it isn't hard...you can do it!"
Anna: (who was trapped at the front of the room; resignedly)  "Well, OK."

The first video (1:47 minutes) highlighted using a large mixed arrangement (both flowers and color) and made 7 arrangements.  We selected a taller thin rectangular vase.  (Re)Arranging Grocery Store Flowers with Oscar Mora | Architectural Digest.


The second video (6 minutes) highlighted 4-5 small separate flower bouquets with complimentary colors using a smaller/tighter vase, Arranging Store Bought Flowers (Fusion/Kim Foren/Geranium Lake)


The third video (3 minutes)  highlighted white and green flowers using an approximately 8" tall cylinder.  Uses flowers of just 1-2 colors and fairly monochrome.  Easy Grocery Store Flower Arranging | Home Hacks | Theodore Leaf


All vases were of clear glass.  Each arrangement was to be based on one of the above videos. competitions. 

After watching the videos, we presented the group with a 'take-home' sheet of "Top Tips" for arranging with ideas that we learned from the videos.

Then the 'SURPRISE' and the competition began...three teams of 2 members each whose names were randomly drawn from a basket were assigned the task of arranging one of the above arrangements.  The supplies for each arrangement were all ready to go on tables and covered by a bedsheet to keep the secret during the meeting that was held before the workshop.  The three teams were given 10 minutes to complete their arrangements  The arrangements were beautiful!  We decided to have NO JUDGING!...just FUN! 


Congratulations and a big thank you to all the participants.  In addition, a prize of a $5 grocery store gift card (in our case, Kroger) was given to each participant.  Then, off to lunch!  Everyone seemed to enjoy the fun interactive program.
 
Beth
 
Supplies  & Equipment Needed: 
 Flowers from the grocery store
Screen/computer/video equipment to show the videos
Two 6' tables
Plastic drop cloths (cover tables for easy clean up)
3 vases
3 lazy Susan's
Water pitchers and water
1-3 frogs (depending on arrangements)
Knives/scissors/clippers
Kitchen timer
Floral tape (taped to the needed vases prior to the meeting and had all ready0
Bedsheet to cover the floral supplies and set ups
Basket & member names already prepared
Gift certificates
Trash bag


Tuesday, March 7, 2017

Tips & Tricks to take better iPhone photos!

Mary Payne presented a large number of helpful tricks and tips that can be found at: http://iphonephotographyschool.com/.  On YouTube search for Emil Pakarklis and you can view several videos from the founder of the iPhone photography school.  Try googling iPhone photography and there will be lots of reading for you.

Marjorie Cooke presented an overview of the iPhone basic editing tools within the Photo App itself, including crop tool, exposure, color enhancement, filters, and such.  She shared a list of three popular photo editing apps. 
 
(Note:  The links here go only to web sites.  For apps go to the app store on your phone)

1.      SNAPSEED – if you only download one app for photo editing, let it be this one!  It is FREE to download from the APP store and you will have fun with it, now that we have reviewed some editing basics.  This app even has a “healing” tool that allows you to remove unwanted objects from your photos!  Snapseed has a skin smoothing editing tool!

2.      VSCO is considered a stylish editing app with built in camera and photo sharing community – a fun bonus.  VSCO is FREE from the APP store and has an incredible range of preset filters.  Think iPhone filters x twenty! 

3.      CAMERA+ is another very popular editing tool and camera app.  It costs $2.99 from the APP store and is an incredibly powerful app with precise control over manual camera functions, including ISO, Shutter speed, white balance and focus.  It has a 30 second timer, and lots of handy layers of editing. 

Start with a good photo: 
  • subject matter
  • light
  • exposure
  • composition
Next, have fun manipulating and/or bringing out the best of your photo!

TOPICS FOR NEXT MEETING

Sharing photos/Storing photos/Managing photos – the challenges!

Anna has agreed to give us a program on LIGHT and its importance in PHOTOGRAPHY!

Consider entering a photo in one of the two online photography contests discussed!

Other apps worth taking a further look:  WaterlogueFilter Storm, Play Memories Mobile, Obscura, Pinterest (google flower photos and be amazed!) & Instagram
 
Some fun iPhone things we tried at our meeting!
 
Still Life

Panoramic
 

Wednesday, March 1, 2017

Metamorphosis: The remarkable life cycle of a Monarch

“When we tug at a single thing in nature, we find it attached to the rest of the world.” - John Muir 

Nature, a symphony, a beautiful piece of art, family and friends are all things that spiritually nurture and refresh me.  Seeing the amazing transformation of an insect from egg to caterpillar to chrysalis to adult is one of those amazing miracles of nature that is definitely a WOW moment.

As part of our club's Pollinator project, I added milkweeds to my urban yard.  My front yard has morphed also from a hillside of creeping juniper (which did harbor snakes and frogs and provided habitat for the food chain) to a yard of black-eyed Susans, asters, milkweeds and other perennial pollinators. 

The first year that I added milkweeds (Asclepias incarnata or swamp milkweed), caterpillars showed up in the fall.  I was hooked.  Lots of caterpillars and lots of eggs.  I anxiously watched for the chrysalis, but none appeared.  I have seen so many in the Canaan Valley area of WV right on the milkweed plant itself.  Where were mine?  Must because of the sheer volume of them at Canaan.  I emailed the Monarch Lab at the Univ. of Minnesota; one of many of my go-to Monarch sites.  A reply was received the next day that the caterpillars can crawl as far as 40' away and equally as high to form the chrysalis and I may never spot one.  I could, though, bring one indoors and watch the metamorphosis.  I knew about how many days it would take for the egg to caterpillar to chrysalis stage, so I just had to get one at the right time.  Big, fat and about 10 to 14 days as life as a caterpillar (5 to 10 days from egg to caterpillar). 


Canaan Valley Monarch


Two small eggs among the aphids
and dirt.  Look for the two small pearly
white circle on the right side of the leaf.


New baby caterpillar.
Look closely to find them.
 
 
Look at all the caterpillars on just a few plants.


There are caterpillar castles, caterpillar hatching kits and many other aids.  All that is really needed though is a clear container or some sort and some screening on the top. And milkweed leaves!  I found a small (about 6"x6"), deep (6"-8")container and some screen in my basement.  I waited for the next batch of caterpillars and grabbed one at what I thought was the perfect size. 

This is Chrys - notice his size.

Day 1:  Beginner's luck as during the night after I brought him in(for some reason Anna and I decided this was a 'he' named Chrys), he climbed to the top of the box and attached to the screen.
Days 2 & 3:  Lots of frass (monarch poop) on the bottom of the container.  At the end of Day 3 the caterpillar started to curl.  I don't think he ate any of the milkweed leaves that I put in the container once he got to the top and attached to the screen.  I left the house around noon and returned by 4.  The caterpillar shed his skin and formed the chrysalis in that brief time.  I hope to actually see this transformation another year.

The caterpillar has climbed to the top of the box and preparing
to attach to the top.
 
Caterpillar frass (poop) in the bottom.  I kept a clean paper
towel on the bottom of the container.
 

Caterpillar starting to curl.
Notice the spot where it attaches in the red circle.

Day 4: The chrysalis is beautiful!

The chrysalis 2 days after formation!
Beautiful.  Love the gold dots around the top.
Botanical jewelry?


Day 5:  I have to go out of town, so with not much urging Anna takes over.  Anna is a beautiful photographer and the rest is her story!
Days 6&7: No change
Days 8&9: The top of the chrysalis is beginning to darken slightly.
Day 10: Faint, light gray lines rising up in a vertical path (wings?)
Day 11: Faint gray/black lines are more visible; definitely wings.  The top of the chyrsalis where it attaches is black
Day 12: Same
Day 13, 14 & 15:  More darkening of the lines.


“Copyright by L. Anna Forbes.  All rights reserved.”  


Day 16:  WOW.  Anna even delayed her departure to the Zone meeting so she could watch and photograph this amazing transformation.


“Copyright by L. Anna Forbes.  All rights reserved.”  
 
 
Full instructions can be found on the Monarch Lab's Rearing How-To's page.

Wednesday, February 22, 2017

BUILDING A BEE HOUSE

Our ongoing study of pollinators and ways to help protect them with creating habitat will lead us to the native Mason Bee this spring.  The March Program will feature Steve Beckelhimer with the West Virginia Master Naturalist Program; Kanawha Valley Chapter.   At least one of our club members has completed the Master Naturalist Program and built a hive/house last year.  We're really looking forward to this program!

First, some brief information about the native Mason Bee: Blue Orchard Mason Bee (Osmia lignaria).  "Honeybees are very important to commercial agriculture, but native bees like the blue orchard bees are better and more efficient pollinators of native crops. There are 140 species of Osmia in North America. They are all known for visiting fruit trees, such as apples, plums, pears, almonds, and peaches. The blue orchard bee or Osmia lignaria, is prized for its efficiency pollinating fruit trees and is one of the few native pollinators that is managed in agriculture." (From the USDA Forest Service Site on the Blue Orchard Bee). 

I first saw insect houses in Switzerland and Germany several years ago.  The houses were fantastic. Very decorative and creative.  I wanted one!!

Stein am Rhein insect houses
 

Ottoschwanden Kurhaus (community center)insect house
 in Freiamt, Germany (Black Forest)
 
Fast forward to this past fall and a visit to the Canaan Valley (WV) National Wildlife Refuge and a trip to the Visitor Center.  Behind the center is a wonderful native habitat garden called The Pollinator Magnet Bed.  The day we visited in September was a very active day.  Monarch caterpillars were on the milkweed and looking closely you could see many other insect.  But, what caught my eye was the Insect Hotel.  I picked up the brochure to bring home and was soon in touch with Candy Olson who is a member of the Canaan Valley Master Naturalist and the one who took all the photos for their brochure as well as photos of the construction of the Insect Hotel.  She then got in touch with Dan Walker who wrote the brochure.  Both have been generous in their permission to share photos and text.  They both belong to a group called The Friends of the 500th established in 1996 (the Canaan refuge is the Nation's 500th National Wildlife Refuge). They are part of a national network of over 250 Friends groups committed to supporting, protecting and improving National Wildlife Refuge resources.

Quoting from the brochure:
The Friends have now entered the accommodations business with an Insect Hotel, shown in the picture below - built entirely with donated or recycled materials and volunteer labor.
 
When finished the hotel is designed to attract insects native to Canaan Valley, especially those that pollinate the native plants.  The roof, high profile, and open sides give air and sunlight to keep brooding areas warm and dry. 


House under roof awaiting the "suites."


House foundation under construction.
Adding the roof.

 
Who is a pollinator?
When we think of pollinations, we think of bees, but many other animals can play a role: pill bugs, butterflies, moths, flies, beetles, wasps and amphibians, as well as bats and other small mammals - all can spread pollen.  Some birds are pollinators, too, such as the hummingbird, attracted for the sugary nectar.  Some visitors may come and go, but others such as bees and wasps may stay in t residence for an entire season going from the egg stage to the larval and ultimately to adulthood.  And contrary to what we might think, most pollination by bees and wasps is performed not by hived insects. 
Ready for occupancy.
 
Who lives where?  (Suites to the sweet?...)
Even if the Hotel is omplete and open for business when you see it, it may still look like a pile of miscellaneous junk.  But is is carefully designed so each insect-pollinator has an appropriate "suite."
 
Notice the following "suites":
Cones and bits of dry bark:  Some beetles and other boring insects like these.  They do not weigh much, so they can stay on the light wire screen under the roof. 
 
Bricks with small holes:  wasps and hornets like these long dry tunnels.
Cut logs:  These will have lots of little holes drilled in them. solitary wasps and bees, such as mason bees, will like those.


A year later.
Bundles of canes (in the clay pipes):  These also appeal to insects looking for places to hide and nest.


There are lots of great sites out there with photos and instructions on building a bee house.  Below are a few favorite links.
 
 
To follow in March - building our own Insect Hotel!

Wednesday, February 15, 2017

MONARCH NURSERY AT THE CARRIAGE TRAIL

Seeds were planted for Kanawha Garden Club's Pollinator Project nearly three years ago.  Garden Club of America (GCA) has long been concerned with the decline of habit, pollinators, the use of pesticides and other related topics.  Pollinators in Peril: The Challenge was issued as a result. 

Garden Clubs and Individuals CAN and DO make a difference.  GCA provided a list of five things that can be done in your own backyard.
1. Eliminate or reduce the use of pesticides in your garden.   Do No Harm!  Use pesticides only if needed, read labels, apply carefully if needed and avoid neonicotinoids. (Texas A&M AgriLife Extension).  You can also ask at your local nursery where their plants are from and buy only from reputable sources that have not been pretreated with neonicotinoids.
2.  Plant for bees and butterflies.  Check with your local & state DNR and native plants societies for plants specific to your area. Lots of sites exist - a few other sites that include lists are The Pollinator Partnership, The Xerces Society and Gardens with Wings (enter your zipcode to find a list of butterflies for your area and the plants that will attract them.
3.  Become involved in your community. Visit your local parks, public gardens and median strips.  Work with your city or park department to avoid pesticides (Charleston Public Grounds is very good!)  Becoming involved ties in with #4 &#5.
4.  Encourage your club to have a pollinator project.  See the description below for our Pollinator Projects.
5.  Plan a program for a garden club about Pollinators.

As GCA challenges us, we also challenge you to make a difference - beginning in your own backyard.  Collectively we can all help.

Kanawha Garden Club first took up the Pollinator Challenge by planting milkweed seeds through our Horticulture Committee.  In March, 2015 our group planted seeds of several different varieties of milkweed native to our area (see Marvelous Milkweeds to Help Save our Monarchs on our blog Sprouts).  By June, 2015 we had several dozen pots of milkweeds to distribute to our membership.  You can follow the progress of these plants on that blog.

August of 2015 our Conservation Committee decided to approach our club and The Carriage Trail to create a milkweed/monarch specific garden The Carriage Trail.  The trail is described below and is a tremendously popular walking trail.  It is listed as a National Recreational Trail. (This site is a great reference site for trails you may want to visit while on vacation)  This project is also described on our blog, Sprouts.http://wvsprouts.blogspot.com/2016/06/pollinators-in-peril-our-pollinator.html and copied below is part of that post. 
"The Sunrise Carriage Trail gently zigzags 0.65 mile and descends 180 feet from the Sunrise Mansion located at 746 Myrtle Road to Justice Row, which is adjacent to the south end of the Southside Bridge. The Trail property is a peaceful and varied landscape of towering trees, wildflowers, ornamental plantings, and historic masonry remains. The Carriage Trail was originally constructed in approximately 1905 by former Governor William A. MacCorkle for the use of oxen-drawn wagons carrying massive stone building materials for the Mansion. Later, Governor MacCorkle used the Trail for his horse-drawn carriage"
An add-on to the trail was the acquisition of Justice Row made possible by a gift from the Hess brothers.  Justice Row was formerly a short spur road with several very small buildings that served originally as offices for local Justices of the Peace.  These were demolished many years ago and the property was acquired and added on to the trail.

At the end of the property there is a small parking area and just beyond that an area approximately 15x15 that receives enough daily sun to host a monarch garden.  In the fall of 2015, our Conservation Committee proposed the establishment of a Monarch Garden.  Accepted by both our board and The Carriage Trail, trays of plants of three varieties of milkweeds were reserved through Prairie Moon.


Monarch Waystation sign.
Your garden can be certified through
MonarchWatch.org
We ordered Asclepias sullivantii, Asclepias incarnata and Asclepias tuberosa.  Plants were received in May, 2016 and on June 1 members of our Conservation Committee as well as members of The Carriage Trail installed the plants.  National Park quality signage was installed in September and October we received recognition as an official Monarch Waystation.  The milkweeds loved the site and showed tremendous growth.  No monarch eggs and caterpillars were sighted - a major disappointment but we are hopeful that they will find our garden next year!

The proposed site.  To the left is a rock cliff, on the right behind the
 fence are train tracks. A parking lot for The Carriage Trail is in front of
the large rock.  The area is approx. 15x15. The City of Charleston helped
clear and prepare the site and partnered with us throughout the summer.


The photo above on the left shows our June planting party; the one on the right growth by late August.


Above is our 'Monarch Nursery Garden signage that will educate the public about the importance of milkweed in monarch habitat and migration.
 
Waiting now for late spring 2017 emergence of the milkweeds!

Our milkweed garden came back this year and was considered a tremendous success.  Most all of the plants survived and grew quite a bit.  The area was filled with the different varieties that were planted.  Here's a photo from May!  Monarchs were seen in August, including caterpillars - so we know that our Waystation is a success.